When your project involves billable expenses, you can manage your epxenses in our platform and they later get added to invoices automatically.
- To add an expense to Workify, first go tothe Expenses section of the platform. URL is https://app.workify.ru/expenses

- Click Add new to open the expense creation modal.
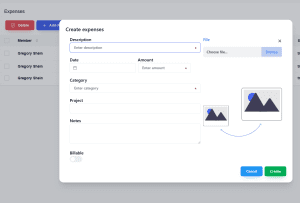
- Fill in the description, amount, and category, and choose the project. The notes field is optional.
- If you want to add this expense later to an invoice, turn on «the billable» switch
- You can add a file (docx or pdf or a photo) for keeping track.
- Choose the expense Date. It determines into which invoice the expense will be included when you choose a date range for the invoice.
- After expense was attached to the invoice, you’ll be able to see invoice number in the «Invoiced» column.
![]()